Why the error `got multiple values for keyword argument` ?

IN our last discussion, we were discussing supported way in python to pass the arguments. And the conclusion was keyworded arguments should always be passed after non-keyworded arguments during method calling.

If we remember, we were getting multiple keyword argument error, while we passed the arguments with * :-

>>> total(kid_name="Adi", *(1, 7, 20, 10, 15 ))
Traceback (most recent call last):
File "<stdin>", line 1, in <module>
TypeError: total() got multiple values for keyword argument 'name'

To debug the second error, I used the inspect module. The getcallargs() method from the inspect module, returns a dictionary, mapping the values passed to the corresponding argument names of the method.

Whenever a method is called, all the arguments that are passed to the method, goes in either of the following two forms :-

*positional :- a tuple of all positional arguments (without keyword) and arguments passed within *() or the extra non-keyworded arguments
**named :- a dictionary of all the arguments passed in form of param=value, and extra keyworded arguments

To understand this, we will take an example of method with **kwargs.

>>> def f(a, b,  *c):
...     print b
...     print a
...     for i in c:
...         print i
>>> import inspect
>>> print inspect.getcallargs(f, 5, 9, *(2, 3))
{'a': 5, 'b': 9, (1, 2, 5, 10, 10 )}

Accordingly, when we call the method in our first example, total("Adi", *(1, 7, 20, 10, 15 )), 'positional' tuple has value (1, 7, 20, 10, 15) and 'named' dictionary has value {kid_name’:’Adi’}.

Once the tuple and dictionary is formed using the passed arguments, the assignment of the values to the arguments is done. During assignment, priority is given to the compulsory arguments. They get their values assigned first. Interpreter checks the list of compulsory arguments (here [‘kid_name’]) and assigns the value from the ‘positional’ tuple sequentially. Any values from the tuple left unassigned, are assigned as extra parameters (non-keyworded arguments).

for arg, value in zip(args, positional):
    assign(arg, value)
if varargs:
    if num_pos > num_args:
        assign(varargs, positional[-(num_pos-num_args):])

In the above snippet, in the for loop, arg contains the named arg i.e. ‘kid_name’ and positional is the list of positional arguments i.e. [1, 7, 20, 10, 15]. And this assigns the argument from the positional list. Note: – assign() is a method within the getcallargs() method, which does the assignment of values to the arguments. Thus, the parameter ‘kid_name’ gets the value 1 assigned to it. And then varargs gets assigned with the list of remaining values i.e. positional[-2:] which is [7, 20,10, 15] as extra parameters.

Once that is done, interpreter goes and does the assignment of the named arguments. Prior to that, it checks, if the named argument has already got any value as part of the assignments.

 for arg in args:
     if isinstance(arg, str) and arg in named:
         if is_assigned(arg):
             raise TypeError("%s() got multiple values for keyword "
                             "argument '%s'" % (f_name, arg))


Here args is the list of compulsory arguments. And, in our case, since we have ‘kid_name’ as our only compulsory argument, so the list args has the only value ‘kid_name’ (i.e. :- args=[‘kid_name’]). If we look at the condition within the loop, it checks whether or not the compulsory argument is under the named list. And, yes, our argument ‘kid_name’ is a keyworded argument, hence, is within the named list. Next, it checks, if the above variable has any value assigned to it, as part of our previous assignment. And, this is also true in our case. We have ‘kid_name’ assigned with 1 as while unpacking the positional list. And, therefore, we have the TypeError :- total() got multiple values for keyword argument kid_name

Hope, we are now clear on why we were getting the error, if we call the method with param = value form and then passing the non-keyworded arguments in form of *(val1, val2,val3,...), at the same time.

Hope this helps. Cheers… 🙂

Passing non-keyworded arguments in Python

Python gives more flexibility to user for defining functions with the support of *args and **kwargs. When user is not sure of the number of arguments to be passed to a function, these *args and **kwargs come into picture.

Let’s assume, 3 siblings save from their pocket money in their piggy banks. Now they want to find who is having how much money? Since none of them know how much notes/coins their piggy banks have, so the only way to calculate the sum total is, use of *args.

def total(*args):
    if args:
        print("total money %d rupees" %sum(args))
    else:
        print("no money present")

Here, since we are not sure of numbers of notes/coins present in the piggy banks, we passed *args, which will calculate the sum of all given coins.

>>> total()
no money present
>>> total(1, 5, 50, 5, 2, 10, 10, 20)
total money 103 rupees
>>> total(1, 1, 5, 5, 10, 20, 20, 5)
total money 67 rupees
>>> total(10, 5, 20, 50, 10, 2, 2, 5)
total money 104 rupees

Now, let’s see how they behave with default arguments. Modifying the above code to print the name of the sibling, whose money is being displayed.

def total(kid_name, *args):
    if args:
        print("%s has total money of Rs %d/- in piggy bank" %(kid_name, sum(args)))
    else:
        print("%s's piggy bank  has no money" %kid_name)

Now lets’ call the method passing a name to it. There are two ways to call the above method.

  • Passing the extra arguments using *
  • Passing the extra arguments directly comma separated
>>> total(kid_name="Adi", 1, 2, 20, 10, 10 )
  File "<stdin>", line 1
SyntaxError: non-keyword arg after keyword arg
>>> total(kid_name="Adi", *(1, 2, 20, 10, 10 ))
Traceback (most recent call last):
  File "<stdin>", line 1, in <module>
TypeError: total() got multiple values for keyword argument 'kid_name'

For both the calls, we are seeing error. In the first call, since, we have passed kid_name='Adi' in form of param=value to which python treats as keyworded argument. But, since, Python does not supports passing of non-keyworded arguments after keyworded arguments, hence this error.

The second error says it has received multiple values for the parameter ‘kid_name’. We will discuss this in detail in the next post.

So, the correct way to make the above call is, to avoid passing the arguments in param=value format.

>>> total("Adi", 1, 2, 20, 10, 10 )
Adi has total money of Rs 43/- in piggy bank
>>> total("Jon", *(1, 2, 5, 10, 10 ))
Jon has total money of Rs 28/- in piggy bank

Hope this helps. Cheers… 🙂

Significance of position of arguments in Python method calling

In Python, position of arguments in method invocation, really has great importance. Let’s look at the following definition and try to understand some of the related concepts.

def demo(name, age=25, country='India'):
    print "%s is a %d years old contestant from %s" %(name, age, country)

In the above function definition, we have 3 arguments. Since there is no default value passed for ‘name’, it is a compulsory argument. The rest 2, i.e. ‘age’ and ‘country’ are optional, as initialized with default value.

When an argument in function definition is initialized with default value, while calling the method, if no value for the argument is provided, then the default value is taken up. So if we don’t provide any value for ‘age‘ and ‘country‘ the default value 25 and ‘India’ would be used.

demo('Adi')

The output of above call would be :-

"Adi is a 25 years old contestant from India".

But, what if we want to pass ‘name’ and ‘country’, but not the ‘age’?  Can we call it as follow :-

>>> demo('Jeff', 'U.S.')
TypeError: %d format: a number is required, not str

No, that didn’t work. The above call throws TypeError, which says number is required. This is because, if values are passed without the argument name in the method call, then python does the assignment as per their position in the method definition. So, by that fashion, in our above call, value “U.S.” gets assigned to argument “age”, which accepts number, not string. Thus the error.

But, yes, if you pass the values for the arguments, along with the respective argument names, then you don’t need to maintain the original sequence as above.

>>> demo(country='U.K.', name="Sam")
Sam is a 25 years old contestant from U.K.

In the above call, even if we have not taken care of the sequence, in which the arguments were defined in the original function call, but, since we have passed the values for the arguments along with the argument name, so Python does understand, which value corresponds to which argument. Hence, throws no error.

Hope this helps. Cheers… 🙂

Making Tuples Mutable !

Tuple in python is special type of data structure. Whatever, we can do with tuple, everything can be achieved through List as well. Again, tuple provides very less flexibility to user, as compared to List. Then why Tuple ? The official Python Documentation says :- being immutable tuples are meant for containing heterogeneous sequence of elements that are accessed via unpacking or indexing. Whereas lists, on the other hand are meant for containing homogeneous sequence that are accessed by iterating over the list. So it needs a wise decision to choose between list and tuple.

The most commonly known difference between list and tuple is mutability. We can change a list, append new element to it, delete element, sort it etc. But, once a tuple is declared, it can’t be changed. If you want to change a tuple variable, then you have to assign the new tuple to the same variable. That will be creation of new tuple whole together, which would create a new tuple in memory and would point the variable to this new address. Let’s have a look at the below example :-

>>> l = [1,2]
>>> id(l)
32231688L
>>> l.append(3)
>>> l
[1, 2, 3]
>>> id(l)
32231688L
>>>
>>> c = 2,3,4
>>> id(c)
30098632L
>>> c.append(5)
Traceback (most recent call last):
  File "<stdin>", line 1, in <module>
AttributeError: 'tuple' object has no attribute 'append'
>>> c = 2,3,4,5
>>> id(c)
31927336L

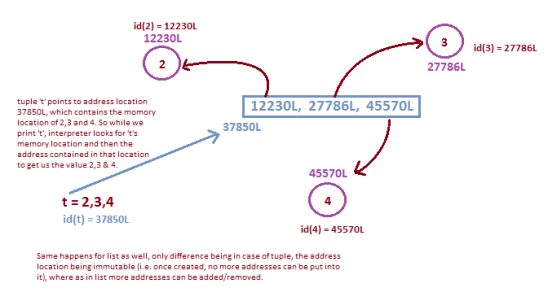
Here, if you look, when we added 3 to the list l, the address of l, remained same as earlier (i.e. 32231688L). But, while we tried the same with tuple, it threw exception, as tuples are immutable. So once, we define a tuple, we can’t change it. When we changed the value of c to (2,3,4,5), the address of c changes as well. This is because, here while we declared (2,3,4,5), it created a new tuple in the memory and pointed c to the new location (31927336L). Refer to the below given diagram.

tuple

This concludes, both list and tuples are collection of address locations. While they are accessed, interpreter looks for the addresses contained in the memory location, (where the requested tuple or list points to), and gets the value for us from those addresses. The only difference is, once we define a tuple, the addresses contained in it can’t be changed, neither more addresses can be added to it, nor can be removed. But, for list, the address to which the list points to, can accommodate more addresses or some addresses can be removed from it as well.

Now, there is still a hack to make tuples mutable i.e. change the tuple, while the tuple will still be pointing to the same address location. Excited to know !!! It’s like conning the tuple. Don’t know about you, but I am pretty excited to share.

Earlier, we saw, tuples contain the address location of the elements. Now, since we don’t have the option to change the value contained in an address location, so we can’t change the values inside a tuple. What if, we put the address of such variable inside a tuple, which can be changed ? Ok,let me put it in more simpler way. Till now, we have been using integers as tuple elements. Here once you create an integer or string, the memory location pointing to the same, will never change and will always point to the same integer. But, if you look at list or dictionary, they would point to the same address location, and at the same time their elements can be changed. So, what if we take tuple elements as list or dictionary !!! Let’s see how this works :-

>>> a = [1,2]; b = [9,8]
>>> # Create tuple out of a & b
>>> t = a, b
>>> t
([1, 2], [9, 8])
>>> id(a), id(b), id(t)
(32231688L, 32236744L, 31014344L)
>>> a.append(4); b.append(7)
>>> a
[1, 2, 4]
>>> b
[9, 8, 7]
>>> t
([1, 2, 4], [9, 8, 7])
>>> id(a), id(b), id(t)
(32231688L, 32236744L, 31014344L)

In above code snippet, I defined two lists a & b and created the tuple t using those two lists. So, the tuple contains address locations of above two lists. Now, even though the lists are modified, their memory location still remains the same. And, since the tuple contains the memory locations of the two lists, so, the content of the tuple. The same would happen using dictionary as an element of the tuple. Was not this a great learning ?

This concludes, be it tuple or list, they all contain address locations pointing to the elements. Declaration of tuple creates a set of memory locations of the elements, where no more addresses can be added or removed afterwards. But, being mutable, list allows the same i.e. modification to the original set of address locations by adding/removing more addresses to/from the original set.

Hope this was helpful and you all enjoyed knowing this “Secret of Making Tuple Mutable”.

Cheers… 🙂

Parsing User Input in Python 3

Recently, while re-visiting my older programs (written in Python 2.7), I thought of making them Python 3 compatible. I realized, to achieve the same, I have to do a lot of changes. Out of those changes, parsing command line arguments was one. Whereever I had used input() in Python 2 those started failing in Python 3.

In Python 2, both raw_input() as well as input() are available for taking user input in runtime. Therefore, before doing the changes, I had to dig in to the basic difference between these two methods. Let’s try to understand the same using following code snippet.

# Python 2.7.6
>>> a = raw_input("enter a number :- ")
enter a number :- 3
>>> type(a)     # raw_input() converts your int to string
<type 'str'>
>>> a = input("enter a number :- ")
enter a number :- 3
>>> type(a)    # input() preserves the original type, no conversion
<type 'int'>

From above snippet, while raw_input() is used, it accepts everything given to stdin as a string. Be your input an integer, while passed to raw_input(), it will be stored as a string (as shown in the above case). But, this is not the same, when it comes to input(). As, you can see, the data type of the arguments to stdin is preserved while used input(). The provided integer still remains as an integer, while we used input(). Now let’s take another example :-

>>> b = raw_input("Enter your name :- ")
Enter your name :- Ferrero Rocher
>>> type(b)
<type 'str'>
>>> b = input("Enter your name :- ")
Enter your name :- Ferrero Rocher
Traceback (most recent call last):
  File "<stdin>", line 1, in <module>
  File "<string>", line 1
    Ferrero Rocher
               ^
SyntaxError: unexpected EOF while parsing
>>> b = input("Enter your name :- ")
Enter your name :- Ferrero
Traceback (most recent call last):
  File "<stdin>", line 1, in <module>
  File "<string>", line 1, in <module>
NameError: name 'Ferrero' is not defined
>>> b = input("Enter your name :- ")
Enter your name :- 'Ferrero'
>>> type(b)
<type 'str'>

In the above code, while used raw_input(), as always, the type is of string. But, in case of input(), the game changes. In the first case, while I entered the full name, it thrown SyntaxError. Next, when I entered first name only, it shown NameError. But, while I passed the name inside the quotation mark, it ran fine. But, why the error in previous two cases? Any guess? If you look into the body of the two methods :-

def input(prompt=None):
  """ input([prompt]) -> value

  Equivalent to eval(raw_input(prompt)). """
  return None

def raw_input(prompt=None):
  """
  raw_input([prompt]) -> string
  """
  return ""

This shows, whatever may be the argument in stdin, raw_input() will always return a string. But, when used input(), the arguments are taken as string format and are evaluated. The input() method, does the evaluation of the given arguments to corresponding data types, which was not the case of raw_input().

So, when I provided my full name to input(), from the traceback, it is clear, name was parsed as string, but failed because of space between name and surname. Because of space, python interpreter assumes both the names as two separate string, whereas input() expects a single argument from stdin, hence error while parsing the argument. In the next, while only the first name is entered without quotes, interpreter assumes it as variable name and searches for the variable named ‘Ferrero’, but could not find any. Hence, the NameError. It would have worked if I would have declared a variable ‘Ferrero’, as shown in below :-

>>> Ferrero = "name"
>>> b = input("Enter your name :- ")
Enter your name :- Ferrero
>>> type(b)
<type 'str'>
>>> b
'name'

But, when we passed the name with quote, python interpreter itself understood it as a string argument. And hence there was no error. Therefore, while using input() in Python 2, we have to be careful about the type of the argument being provided to stdin.

To avoid this, in Python 3, the functionality of input() has been removed and raw_input() has been renamed to input(). So, in Python 3, input() serves what raw_input() was serving in Python 2. And, functionality of input() from Python 2 exists no more in Python 3. Therefore, whatever entered to stdin are interpreted as string in Python 3.

Making Your Python 2 input() compatible with Python 3 :-

  1. If your Python 2 code has raw_input(), using input() will take care of everything, since both of them accept the input in string format.
  2. If your Python 2 code has input() in it, then you have to use eval() method in Python 3 which will take care of conversion (as in case of input() in Python 2). So your code will be something like this :-
    # Python 2.7
    >>> name = input("Enter your name :- ")
    Enter your name :- 'Ferrero Rocher'
    >>> roll = input("Enter your name :- ")
    Enter your name :- 8
    
    #Python 3.5
    >>> name = eval(input("Enter your name :- "))
    Enter your name :- 'Ferrero Rocher'
    >>> roll = eval(input("Enter your name :- "))
    Enter your name :- 8
    
    
  3. If you want the same code to work both in Python 2 and Python 3, then you can use the below snippet :-
    • Method 1 :-
      You can use try-except and map input() to raw_input() for Python 2. So, whenever a call is made to input() method, in try block raw_input() is mapped to input(). So when you run the code in Python 2 and your program calls the input() method, then internally raw_input() will be executed. And while you run the same in Python 3, the mapping input = raw_input will throw NameError since, there is no variable(or method) named raw_input() in Python 3. So, it will move to except block and call will go to input() method.
         >>> try:
         ...     input = raw_input
         ... except NameError:
         ...     pass
      
         >>> name = input('Your name :- ')
         Your name :- Ferrero Rocher
         >>> name
         'Ferrero Rocher'
         
    • Method 2 :-
      Other way to do this is to check the python version through code and use the appropriate method (i.e. raw_input() in case of Python 2 & input() in case of Python 3).
         >>> from sys import version_info
         >>> def user_input(msg):
         ...     if version_info[0] <3:
         ...         val = raw_input(msg + " :- ")  
         ...     else:  
         ...         val= input(msg +" :-")  
         ...     return val  
         ...  
         >>> name = user_input("Enter your name")
         Enter your name :- Ferrero Rocher
         >>> roll = user_input("Enter your roll")
         Enter your name :- 8
         >>> name
         'Ferrero Rocher'
         >>> roll
         8
         
    • Method 3 :-
      Or else, you can simply use input(), which will work for both Python 2 as well as Python 3. But, you have to be careful about the input format (i.e. how you are providing input to stdin), while running the code on Python 2. However, for Python 3, this will be taken care, as everything will be converted to string. But then, inside your code, you need to take care of the conversion of the input to appropriate data type.

Hope this helps… 🙂

Accessing Windows Registry using Python’s winreg module

Recently I worked with Python’s _winreg module (renamed to winreg in Python3). The module gives the access to the Windows registry. Using the available methods in the module, one can easily, create, delete keys and values, set given values to specific key, create subkeys etc… Along with, it also defines the registry constants and access privileges  for ease of user access.

However, my concerned part was to access the registry key and read their value. Initially, it took me one day to understand how to use this module. Now since, I am pretty much familiar, I am writing this post. But, I understand, the pain of a first time learner.

I used 3 methods. first is OpenKey which is used to open a registry key, before you can access it. This method,takes the key that you want to open as the argument. If you want to open a subkey, for a given key, you can pass that as well. Example :-

from winreg import *
ob = OpenKey(HKEY_CURRENT_USER, r'SOFTWARE\Python\PythonCore\3.5')
# Here ob is the handle, using which further access (Read) the given subkey.

The detailed syntax is :-

OpenKey(key, sub_key[, res[, sam]])

key :- Registry constant (HKEY_CURRENT_USER in above example)
sub_key :- particular key you want to access from the given registry constant (‘SOFTWARE\Python\PythonCore\3.5‘ in above example)
res :-  a reserved integer, and must be zero. The default is zero.
sam :- an integer that specifies an access mask that describes the desired security access for the key. Default is KEY_READ.

From the syntax, it is clear that, for OpenKey, the default access permission is set to KEY_READ. So, if no access mode is specified, then the key is opened with READ access.

Remember, while accessing keys, you might see WindowsError: [Error 5] Access is denied exception, for some of the keys. Not some, in fact, for many of the keys. This is because, Windows Account Control (UAC), doesn’t give KEY_ALL_ACCESS on those keys, even for an Administrator.  KEY_READ also throws the same exception, for few of the Keys as shown in the below example.

>>> import winreg
>>> a = winreg.OpenKey(winreg.HKEY_USERS, 'S-1-5-18')
>>> a = winreg.OpenKey(winreg.HKEY_USERS, 'S-1-5-19')
Traceback (most recent call last):
File "<string>" line 1, in <fragment>
WindowsError: [Error 5] Access is denied
>>> a = winreg.OpenKey(winreg.HKEY_USERS, 'S-1-5-20')
Traceback (most recent call last):
File "<string>";, line 1, in <fragment>
WindowsError: [Error 5] Access is denied

As you can see, on the above code snippet, I can access S-1-5-18 easily, but, while trying to access S-1-5-19 or S-1-5-20, Access Denied error is thrown.

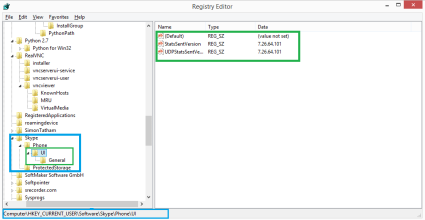
The next two methods that were of my use, are pretty much similar – EnumKey and EnumValue which are used to enumerate over the subkeys and values respectively for a given key. Both the methods accept the key and the index whose key or value you want to find. For a better understanding, let’s have a look at following image.

registrykey

Here, if you look at the path in the bottom, HKEY_CURRENT_USER is the Registry constant and ‘Skype ‘ is a subkey in the given constant. When, We do Enumkey (with index=0) on Skype, it will give us it’s subkeys, i.e. Phone. Likewise, if we invoke EnumValue (with index=0) on Skype\Phone\UI, it will give us it’s first value [i.e. (‘StatsSentVersion’, ‘7.26.64.101’, 1) ], in form of a tuple.

m = OpenKey(HKEY_CURRENT_USER, r'SOFTWARE\Skype')
>>> print(EnumKey(m, 0))
Phone
# Now let's see find the value
>>> n = OpenKey(HKEY_CURRENT_USER, r'SOFTWARE\Skype\Phone\UI')
>>> t = (EnumValue(n,0)) # 0 is the index to find the value
>>> print(t)
('StatsSentVersion', '7.26.64.101', 1)
>>> print(type(t))
<class 'tuple'>
>>> t = (EnumValue(n,1)) # set index to 1 to get the next value for the key
>>> print(t)
('UDPStatsSentVersion', '7.26.64.101', 1)

So both Enumkey and EnumValue throws WindowsError, in case of failure. Failures might be when there is no key or value existing for your provided index. To get all the subkeys for a given key, you have to increment the index one by one and invoke Enumkey until you encounter WindowsError. The same goes for EnumValue to find out all the values for a given key.

You can find out the same code on my Github. Here, it iterates over all available subkeys or values, increasing the counter by 1 until each keys or values are traversed.

Hope, this would be helpful… 🙂

Let’s start with Git – Creating your own Repository…

From the previous post, we have a brief idea on what and why Git. Now, let’s procced for the how part. We will create our own repository and see how Git works. Prior to that we need to create our account on Github.

Your Own Repository :-

-> Go to Github.  Select ‘Repository’ tab from top. Click on the ‘New’ button.

New_Repo
-> On the next page, you will be asked to provide a name to your repository.
-> Give a description and choose the visibility whether you want to make it ‘private’ or ‘public’.
-> Click on ‘Create’ button. And you have a repository with the provided name.
-> In the top, you have the path for the newly created repo (See the below image).

Git-path

Now, clone this repo to your local machine :-

git clone <path to the repo you found from above>
# For above it would be
git clone https://github.com/PabitraPati/Automation-for-MS-SQL-DB.git

A directory with the Repository name will be created on your local machine. If you remember, from the definition of  Distributed Version Control System, the clone of the original repository is also a repository. So, the directory that was created on our local machine after cloning the original repo, is not just a directory, rather it’s the repository. Going ahead, we will refer this as Local Repo and the repo in Github as Main Repo.

Adding Files to the Repository :-

Now let’s go inside the repo and add some files. Then, do a git status. This will show the added file as untracked. Let’s understand what this means.

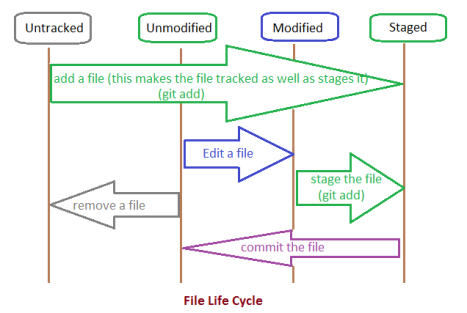
Basically, there are two kinds of files in Git – Untracked and Tracked. Untracked files are those which are not tracked by Git repository. In simple words, there presence in the Repository is not accounted as if they are not present. Even if these files are modified, it doesn’t affect the repository. On the other hand, for tracked files, all actions (like modify, delete) are tracked by the Git repository. To make an untracked file as tracked, we

Now these Tracked files are further sub-divided into 3 categories.

  • Unmodified :- Files that are not changed since last commit
  • Modified :- Files those have been modified after last commit
  • Staged :- Out of the modified files, the files that are to be committed in next commit.

To be more clear on Staged files, we can say, it acts as buffer between working directory and project directory. Since last commit, there might have changes in multiple files in your working directory. But, not necessarily, all the files, you want to commit. No
w, this staging area lets you group, only those files those are to be committed. In simple terms, when you are satisfied with the changes to a file and want to commit it, then
stage
 the same. A file before being committed, needs to be staged. Staging of file is done using git add . git add makes an untracked file tracked.  So ideally, the file life cycle in Git is like :-
File Life Cycle

Staging the changes :-

Till now our file is untracked. So let’s add it.

git add Compare_DB.py
git status  #  will show Compare_DB.py under 'Changes to be committed'
            #  which means the file is now tracked as well as staged
git diff   #  will show nothing. Lists the changes made to a previously
           #  committed file in local repo. We have staged the file
           #  but not committed. So repo still doesn't have the file.

git diff --staged   #  this shows the diff of staged files. Since,
                    #  Compare_DB.py is a new file, so the whole
                    #  file content will be shown in --staged diff

But, if you have some other files still present in the directory, but are not added (or staged) will continue to show as Untracked files. In the working directory, files are added, modified, staged, again modified, and again staged. This continues till user is done with his modifications. Let’s modify the staged file and repeat the above command sets without staging the changes (i.e. without doing a git add).

Doing a git status will show Compare_DB.py under ‘Changes to be committed’ as we have not committed it yet. Also, under ‘Changes not staged for commit’, since we have modified it after last staging, but those modifications are not staged yet. git diff will show the newly added line, where as git diff –staged would be same as previous i.e. will show the whole file content.

Stage the modification by git add Compare_DB.py. Now git status will show Compare_DB.py under ‘Changes to be committed’ only, not under ‘Changes not staged for commit’, as we have staged it. And git diff will show nothing. But git diff –staged will show the newly staged file. This concludes,  git diff lists the changes made to an already committed or staged file (until the file is staged). Changes done to Untracked files are not listed by git diff.

Commit the changes :-

Let’s commit the staged file.

git commit -m "Adding Compare_DB.py"

Here m is used to provide the commit message for later tracking purpose. Since, we have committed our changes, so now, git diff  and  git diff –staged  will show nothing. Since, we have a single file in our repo to commit, so we haven’t given the file name to commit. But, out of multiple staged files, if only selected files needs to be committed, then we have to provide the file names that we want to commit. Else, all the staged files would be committed.

git commit -m

Understanding ‘git status –diff’ :-

Now let’s modify the file which has been committed. Once modified, git diff would list the changes done. But, git diff–staged would show nothing.

Now, let’s stage the file. Once staged, git diff  will show nothing and  git diff –staged  will show the changes that we staged currently, which concludes, the changes that are staged, but not yet committed are listed by  git diff –staged. Listed below are the behavior of  git diff –staged :-

  • Shows changes for staged files only. If changes are made to file, but are not staged, then those changes are not listed.
  • For a newly added file (staged for the first time), the whole file content will be shown
  • If an already staged (but never committed) file is modified and staged again, then the difference between current stage and the previous stage will be listed.
  • If an already committed file is modified and then staged (1st staging after commit),  then changes made after last commit are shown.
  • If an already committed file is modified and then staged, again modified and staged again (2nd staging after commit),  then changes the first and second staging are shown. In other words, if an already staged file, is modified and staged again, then the modification between the two stages are listed.

Thus, git diff –staged ensures, whether the staged files, that user is about to commit, are correct or not, before committing the changes to the repo.

Now, let’s commit our modifications. If we check git status now, this will show something like :-

[root@localhost Automation-for-MS-SQL-DB]# git status
On branch master
Your branch is ahead of 'origin/master' by 2 commits.
(use "git push" to publish your local commits)
nothing to commit, working directory clean

In the above shown message, branch refers to our local repo and origin refers to the repo on Github. Since, on our local repo, we made two commits for Compare_DB.py, which are not yet in the main repo, hence this message. Just to confirm, go to your repo on Github and check, the repo still will be empty. However, our local repo contains the added file Compre_DB.py. In order to make it available on Git repo, we have to push the changes that are committed to the local repo to the main repo (i.e. repo on Github).

Pushing changes to Github :-

git push

You will be asked for your Github credentials for pushing the changes. Entering correct credential will push your changes from your local repo to Github repo. Now, if you do git status, you will see something like :-

[root@localhost Automation-for-MS-SQL-DB]# git status
On branch master
Your branch is up-to-date with 'origin/master'.
nothing to commit, working directory clean

which says, currently every changes on local repository is present in the Github (or master) repository and both the repository are at same level.

Congrats, you successfully done your first push to your first repository on Git. With this, we completed our baby steps to Git. In the next post, we will see, how to push our code to other repositories that are managed by some other person.

Hope this helps. Cheers… 🙂

Let’s start with Git – Why Git ?

Git is one kind of version control system. Version Control System (VCS) are used for source code management. The basic goal of having version control system is to keep track of the modifications made to the source code. So, it keeps the change history for all the files present in the repository. Thus, gives developers the flexibility of backtracking to a previously stabilized version of code the in case of any mistake.
Now there are two kind of version control systems.  

  • Centralized Version Control System
  • Distributed Version Control System

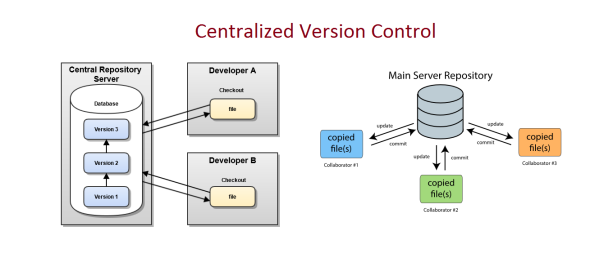
In Centralized Version Control System, there is a central copy of  the project at a location (say Server), and developers push their code into that
central copy. Programmers no longer have to keep many copies of files on their hard drives manually, because the version control tool can talk to the central copy and retrieve any version they need on the fly. But, the main disadvantage with C
entralized Version Control System is, single point failure. Since, there is only one central server for storing the files, if in case the storage hard disk is  corrupted, then the entire source code is lost, unless any backup is kept for the same.
CentralizedVCS
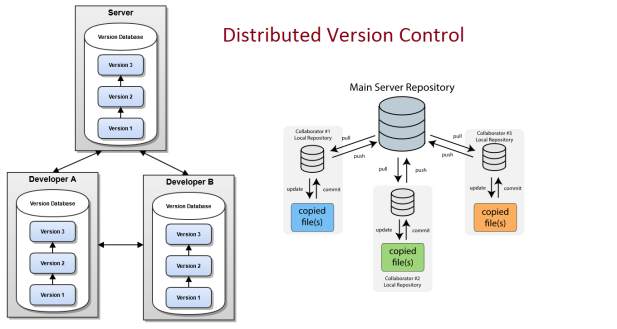
Therefore, the concept of Distributed Version Control System came in place. Here, not just the latest code base is copied while user pulls the changes from the repository. Rather, the whole repository is  mirrored (or cloned). So this new repo has same functionality as of the original one along with the full history of the project. So, if the central repo gets corrupted, then any user copied repository can be copied back to the central server to restore it. In this kind of version control, every copy of repository is really a full backup of the central repository.

DistributedVCS

Why Git ?

     So, Git is one such kind of open source Distributed Version Control System, developed by Linus Torvalds. Following are few reasons why Git is the most popular repository now a days. 

Stores not only the Delta, but the Whole File :-  Other version control systems, do use a file-based and file modification-based storage system. So, each revision is composed of a list of differences for each modified file, i.e the deltas of the files. Whereas in Git, the whole file is stored. Each revision in Git is like file system. In each new revision, the modified files are copied, and the files that are not modified, are linked with the previous revision. So below diagram illustrates the difference clearly.
Git Vs VCS

 Pretty Much A Local Repo :-  As, Git creates the clone of the original repository in user’s machine, while user pulls the changes on to his local machine, so every operation on Git is local. In case of Centralized Version Control, user needs network connection for operations like Commit, Diff comparison etc… But, in Git, since the local repo contains everything, along with the previous version history, so there is no need of internet to commit or to get the diff between files.

 Integrity due to Checksum :-  As there is no single point of synchronization (no central server) in Git, so revisions can’t be numbered sequentially. Hence, Git revisions are identified with a checksum calculated using SHA-1 algorithm based on the contents of a file or directory structure. Prior to storing anything into Git, first it’s checksum gets calculated, and then is referred by that checksum. This approach of data storage protects the code and the revision history against accidental and malicious change and ensures that the history is fully traceable.

 Nothing Ever is Deleted in Git :- Every action on Git, is simply adds data onto Git database. Nothing ever gets lost. Even if user deletes a file, but the file still exists in history. So user has a provision of getting back everything in case the repo gets screwed up.

In the next post, we will experiment on how to create our own repository and work on the same.

A deeper analysis of Python’s strip, lstrip & rstrip

Python has three basic methods namely strip(), lstrip() and rstrip() for doing stripping on the given strings. The basic syntax is as follows :-

str.strip([chars])
str.lstrip([chars])
str.rstrip([chars])

chars
    Optional. String specifying the set of characters to be removed. 
    If omitted or None, the chars argument defaults to removing whitespace. 
    The chars argument is not a prefix; rather, all combinations of its 
    values are stripped.

The strip() method returns a copy of the string with the leading and trailing characters removed.Likewise, lstrip() and rstrip() removes the specified characters from left and right of the string respectively.

But, since providing the character sequence into this strip methods is optional, so, by default, when no character sequence is provided, only removal of white spaces from the string, is done by these methods. The strip() method removes both leading as well as trailing white spaces from the given string and returns the new copy.Likewise, lstrip() and rstrip() method returns the string with leading and trailing white spaces removed respectively. Let’s have a look at the following example :-

# input string is word 'spacious' with 3 spaces to left and 5 spaces to the right
>>> a = '   spacious     '
>>> len(a)
16
>>> b =a.strip()
>>> b
'spacious'
>>> len(b)
8
>>> len(a)
16
>>> c = a.lstrip()
>>> c
'spacious     '
>>> len(c)
13
>>> d = a.rstrip()
>>> d
'   spacious'
>>> len(d)
11
>>> len(a)
16

So, with a closer look, we assigned b=a.strip() which, removed the leading and trailing white spaces from string a and assigned the resulting string to b. But, when we printed a it is still the same original string. The next line len(a) confirms the same. Whereas the len(b) gives 8 removing the 3 white spaces to the left and 5 white spaces to the right. But, c = a.lstrip() removed white spaces only to the left, hence c has length equal to 13 (8 characters from the word and 5 spaces to the right). In the same way, d = a.lstrip() removed white spaces only to the right of the string, hence len(d) gives 11 (3 spaces from left and 8 characters from the word). So, this concludes, all these strip methods acts upon the provided string and returns the resulting string without modifying the original string.

With this, I guess we are pretty much clear about strip()lstrip() and rstrip() , when no argument is passed. Now let’s proceed towards passing character set to these methods and see how they work.

So, when a character set is passed as an argument to any of these strip methods, the interpreter tries finding all possible combinations of the provided character set from the given string and removes the same. All these methods continue stripping operation, until a character that is not specified in the given character set, is found in the string. So, let’s understand it with example :-

>>> 'ABBA'.strip('AB')
''
>>> 'ABCBA'.strip('AB')
'C'
>>> 'ABCBBAA'.strip('AB')
'C'
>>> 'ABCBBAA'.lstrip('AB')
'CBBAA'
>>> 'ABCBBAA'.rstrip('AB')
'ABC'

In the first example ‘ABBA’.strip(‘AB’), all possible combinations of A and B (i.e. any of ‘AB’,’BA’,’AA’ or ‘BB’) are searched. And strip() removes all such combinations, so output is .

In the next two examples, for ‘ABCBA’ and ‘ABCBBAA’, all possible combinations like ‘AB’,’AA’, ‘BA’ and ‘AA’ are removed. But, since ‘C’ was not in the passed character set, so was ignored, and hence was returned.

The last two examples show the behavior of lstrip() and rstrip(). In case of lstrip() the combinations of ‘A’ and ‘B’ from the left of the string were tried and stripped. When, ‘C’ was encountered, but was not found in the provided character set, interpreter stopped stripping and the remaining string ‘CBBAA’ was returned. Notice, this did not remove the combinations (‘AA’ & ‘BB’) right to C in the string. Likewise, in rstrip(), combinations from right to left were searched and stripped ‘AA’ & ‘BB’. On, encountering ‘C’, the stripping was stopped. And no combinations from left were removed. So the returned string was ‘ABC’.

By now, we are familiar how these three strip methods differ from each other in terms of behavior. So, let’s focus on any one method and go deeper into it. Once, we are clear on any one of these, we can relate them with other two methods. Let’s proceed with rstrip() method.

>>> 'ABCABAB'.rstrip('M')
'ABCABAB'
>>> 'ABCABAB'.rstrip('B')
'ABCABA'
>>> 'ABCABAB'.rstrip('A')
'ABCABAB'

In the first case, the provided character ‘M’ was not found in the string while searched from right. So, nothing was stripped and the string was returned as it is. In the next one, given character ‘B’ was found at right most end, so was stripped. But, moving ahead towards left, it encountered ‘A’, which was not in the provided character set. So the interpreter stopped stripping there and returned ‘ABCABA’.

In the last example, the character provided ‘A’ was not found in the rightmost end of the string. So, interpreter stopped there without moving further left. Even if, there are ‘A’s present in the string, the interpreter did not stripped them, since rstrip() searches for the character from right to left of the string and expects presence of any of the provided character at rightmost end. Else, searching stops there only.

Now let’s go one level deeper. Let’s try a little difficult examples :-

>>> 'www.docomo.org'.rstrip('rgo')
'www.docomo.'

Here, the given character set ‘rgo’ does not matches with the stripped portion ‘org’. But, still the string ‘org’ was removed. This is because, the order of the occurrence of the given characters in the string, doesn’t matter for stripping. These strip methods, don’t search for the sequence (or order) of the given characters in the string. The characters provided as parameter, is a set, not a string that it will be searched for exact match. So, out of the characters provided, interpreter searches for all possible combinations (not the exact order) till it finds a character that does not belong to the provided character set. Now, let’s look at the below code piece :-

>>> 'www.docomo.org'.rstrip('rg')
'www.docomo.o'
>>> 'www.docomo.org'.rstrip('zrgp')
'www.docomo.o'
>>> 'www.docomo.org'.rstrip('or')
'www.docomo.org'

First example is pretty clear. In second, the interpreter stripped whatever characters it found in the given string(‘r’ &’g’), out of the provided character set. And, the characters, that are provided in the character set to be stripped, but not present in the string (‘z’ & ‘p’) in this case, are simply ignored. In the last example, even though all the characters from the character set (i.e. ‘o’ and ‘g’) are present, in the string (‘www.docomo.org’), but while traversing from right to left (since rstrip() is provided), the first character found in the string is ‘g’ which is not present in given character set ‘or’, so the interpreter stopped there only and no stripping was done on the string. Hence, the input string was returned as it is.

In the below case :-

>>> 'www.docomo.com'.rstrip('cm')
'www.docomo.co'

Even if both the characters (‘c’ and ‘m’) are present in the string, but rstrip() removed only ‘m’, not ‘c’. This is because, after stripping ‘m’, the interpreter encountered ‘o’ (right to left traversal in rstrip()), which is not in the provided character set. So, stripping stopped and the string returned with only ‘m’ removed from it.

Now, let’s try what will be the output of following one :-

>>> 'www.docomo.com'.rstrip('com')

Many of us will get ‘www.d’ as the answer to the above one. And the justification is :- the provided character set ‘com’ matches ‘com’ as well as ‘ocomo’ from docomo in the string. But, with a closer look, a ‘.’ (dot) can be found in between ‘docomo’ and ‘com’, which is also a character. But, this ‘.’ (dot) is not in our given character set to be stripped. So, interpreter stopped stripping on encountering dot(‘.’) and will return ‘www.docomo.’.

But what if, we pass ‘.com’ (or any shuffled set of these characters like ‘mo.c’, or ‘c.mo’) as the character set? Then, it will strip dot(‘.’) as well and proceed leftward to find further matches of given characters. And thus, the match found would be ‘ocomo.com’, and will be stripped, leaving ‘www.d’ as the output.

>>> 'www.docomo.com'.rstrip('com')
'www.docomo.'
>>> 'www.docomo.com'.rstrip('mc.o')
'www.d'

Now, since we are clear on rstrip(), so we can also analyze how strip() and lstrip() would behave.

Hope this helps you to have a deeper understanding on Python’s strip(), lstrip() and rstrip() methods.

Cheers… 🙂

Adding SAN Datastore to ESX host

IN the previous post, we learn how to add a dummy NAS datastore to ESX host. IN this post, we will see how we can add a SAN Datastore. For this, we would be needing an Windows Server 2012 Machine, and iSCSI service installed.

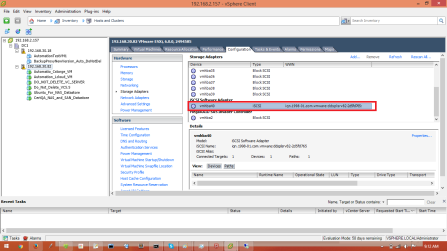
Prior to configuring the iSCSI target, you need to add an iSCSI adapter to your ESX host, through which all the communication between your ESX host and the iSCSI target will take place. The software iSCSI adapter built into ESXi, facilitates the connection between host and iSCSI target on the IP network through the physical NICs. To add a software iSCSI adapter, go to your ESX host. Select the Configuration tab -> Storage Adapters. Click on ‘Add’ button from the top panel and select ‘Add Software iSCSI Adapter’ option then add it. In the task bar wait till the process completes. Once completed, you can see an iSCSI adapter listed in your storage tab with a WWN. We will be needing this WWN later, to configure the targets. Once added, select the same and go to the Details tab below the adapter listing. Select ‘Properties’ from top right corner and in General tab or Property window, verify the status of the adapter is shown as ‘Enabled’. If not, then select Configure button in the below, and select the Enabled checkbox. Now your iSCSI adapter is enabled.

scsi-addpter-added

Open Server Manager. From Dashboard, select ‘Add Roles and Feature’. Click Next on ‘Before you Begin’ section. On Installation Type window, select ‘Role-based or Feature-based installation’, the default selected option.
add-role1
Select your server, (by default will be selected) in server selection window. In the next window, select ‘iSCSI Target Server’.

scsi-service

Without changing any selection from Features, proceed to Confirmation window. This would show ‘iSCSI Target Server’. Proceed for the installation. scsi-service2

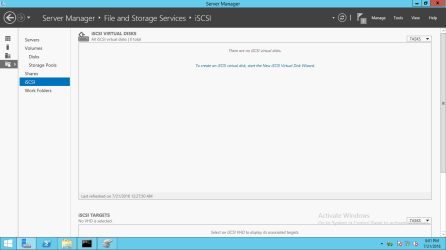
Now iSCSI service is installed on your system. Go to ‘File and Storage Services’ tab and select ‘iSCSCI’ tab. Now, since we have added no iSCSI disks, nothing is ‘iSCSI Virtual Disks’ widget.iscsci-virtual-disk

  1. Now, once your iSCSI target server is enabled, to add a new iSCSI Virtual Disk, click on the link ‘To create an iSCSI virtual disk, start the New iSCSI Virtual Disk Wizard’ on the widget. If you already have a iSCSI disk, right click on the wizard, and select ‘New iSCSI Virtual Disk’.
  2. A new window will pop-up. Your server will show up there. In the ‘Storage location’, you can either choose a complete volume or a particular directory as a custom path.
  3. In the next window, give the name of your SAN volume to be created. In next window you need to specify the size of the disk you are going to create. Choose ‘Dynamic Expanding’ option.
  4. Select ‘New iSCSI target’, since we don’t have any pre-existing target.
  5. Enter name and description for the target to be created.
  6. In the next window, i.e. in ‘Access Servers’ tab, we have to add the initiators, which will access this virtual disk. In the beginning, we have added iSCSI adapter to our ESX host and have a WWN for the same. Click on ‘Add’ button to add a new initiator. Select the last option i.e. ‘Enter a value for the selected type’. In ‘Type’ select IQN, and enter the WWN value of the iSCSI adapter you have in the ‘value’ field, then click ‘OK’ to add the initiator.
  7. In the next page i.e. on ‘Enable Authentication’ tab, let everything as it is (by default none of the options are selected). The next page is just confirmation of whatever we have done yet. Verify the same and then click ‘Create’ to create your iSCSI disk. The result window will show the completion of each steps. Then you can see your added virtual iSCSI disk under ‘iSCSI Virtual Disk’ window.

Refer to the attached slides for above mentioned steps.

This slideshow requires JavaScript.

Now, we will add the above created virtual iSCSI disk as a datastore to our host. For that, Go to Configuration -> Storage tab of the ESX host. Click on ‘Add Storage’ link. Select ‘Disk/LUN’ and proceed. While creating the iSCSI disk above, we had mapped the initiator (SCSI adapter from our ESX host) to the virtual iSCSI disk. So, the next window will show our virtual iSCSI disk allowing us to use that. Select the same and proceed. In the next window, select VMFS-5 as the ‘File System Version’. Verify the above given details in Current Disk Layout window. Enter a name for your datastore in Properties window. Out of all available space of the virtual disk, specify the amount of storage you want to use as  datastore. The next ‘Ready to Complete’ window will show you the summary. Verify the same and click on finish. The attached slides will guide you for each steps mentioned above.

This slideshow requires JavaScript.

Now your virtual iSCSI disk will be added as a datastore to your ESX host. You can find the same in the datastore listing.

san-datastore-added

Hope this helps… 🙂